Thursday, May 31, 2012

Got graduate?


My Stampin Up demo friend, Brenda, showed me how to fold up this adorable card. I decided to recreate it with a Paper Smooches sentiment and decorate it with a new DCWV set of papers called The Snapshot Stack. (I made the tassel with red cord but I think next time I'll try floss...) When this cute grad hat unfolds, this is what my recipient will see:


 All these papers are from the stack. Even the banner was cut from a sheet of banners. I just love DCWV. Their creativity make me look good. Lol. As an example, look at this glittery 12"x12" sheet that I cut up to get that one polaroid image for my card:


So, now I want to show you the steps for folding the hat so you can make your own graduation cap card.

Step 1: Cut an 8"x8" square of sturdy black cardstock. Score at 4" both ways, then score diagonally from one end to another. Only one diagonal score.


Step 2: Fold the 4" lines in. Then turn the square over and fold along the diagonal line. If the 4" lines are mountain folds, then the diagonal is a valley fold. Okay?


Step 3: Use your pointing finger to press down on the center of the square and it will automatically fold in a little.


Step 4: Bring in the sides ...


Step 5: After you've got your folded card ready, then use your bone folder to make all the creases crisp...


Step 6: Make a hole at the center of the front panel for your tassel. Send the string through the hole and secure it with a brad. You will cover the string on the back with patterned paper.... in my case, the polaroid image.

Step 7: Cut a 4" x 5-1/4" panel of white cardstock then mat it with a 4-1/4" x 5-1/2" panel of sturdy black cardstock. Add the sentiment on the bottom and attach the hat above. Decorate the inside squares with 3-3/4" x 3-3/4" patterned paper. For the triangular sections, I just took another two similarly sized squares and cut them on the diagonal. They fit perfectly.

I hope you're tempted to try this. It will surely bring a smile to the face of your honored graduate.

Have a wonderful day and thanks for dropping in!

Wednesday, May 30, 2012

What's on Your Workspace Weds (WOYWW) #156

This is a special WOYWW for the keeper of the flame, Ms. Julia. It marks her 3rd year of running this fun weekly event. Where else can you spy on the workspaces of crafters around the world? Love it. So I'm joining in today and playing along with the game devised for this occasion. Make an ATC for the person who follows you in the blog list. I have to admit, I had something else planned for today so I went to my stash and found an ATC to give away. Here it is. It uses Stampin Up sets: In the Wild, Rough Edges and Flexible Phrases.


Use this LINK to check out the desks this week. You walk away inspired for sure!

I almost forgot to post a picture of my desk today. Here it is.


It has all the chaos related to the card I was going to post today. But, it will have to wait until tomorrow. It's a graduation card with a fun folding twist. See you then. *smile*

Saturday, May 26, 2012

Operation Write Home Blog Hop


Hello. It's time to pause and honor all the men and women who have given their lives to fight for our country. The folks over at Operation Write Home honor our soldiers every day by gathering homemade cards for their use. Today they are hosting a Memorial Day blog hop based on their sketches. Check out the hop on their blog post today and leave a comment for the chance at a prize and then access their .pdf of 100 free sketches! Maybe you can use some to make cards for their ongoing drives. I plan to.

But first, I have the need for a quick card for a friend that is celebrating her birthday on the day after Memorial Day. This card illustrates my wish that someone makes HER dinner on her special day, even if it's just a grilled hamburger.... *smile* (P.S. I didn't forget to color in the cheese on her burger... she doesn't like cheeseburgers! Lol.)

I used Sketch #119 which really sped up the process. As my card idea came together, I knew the Sunnyside Lane paper by Pink Paislee would be the perfect backdrop for the picnic scene and the DCWV gingham could be a cute tablecloth. Alfresco and Sentiment Sampler were the adorable Paper Smooches stamp sets used here. A scalloped border punch (Stampin Up) and nesting circle dies (Spellbinders) helped add the features suggested on the sketch.

This card is making me hungry. I may just have to have a burger for lunch!

Thanks for dropping by. Have a happy and safe holiday weekend.... more cards to come soon....

Friday, May 25, 2012

Believe in angels....


May is a busy card making month for me. I have several aunts that have birthdays and I've spoiled them with cards over the years so I can't stop now. Lol.

One aunt loves angels so I turned a new stamp from Unity's Ippity line called Angie Girl into an angel by adding wings from another set (March 2011 Kit of the Month - Just You.) The sentiment came from an older set I have in my stash (May 2010 Kit of the Month). I recently took a 12x12 pad by K&Co called Que Sera Sera and cut the papers up into 4x6 panels and this little inventory of papers are serving me well when I have to make a quick card. I particularly love that the papers all have some form of texture already on them. You may not be able to see it but the pink panel I used here has a puffy raised flourish in the bottom right corner. Love it. I think my aunt will, too.

Thanks for dropping by. I think I'll submit this to Unity's Friends with Flair blog hop today. Check it out. Lots of fun cards over there.

Have a happy Memorial weekend! *smile*

Tuesday, May 22, 2012

Have Sweet Day, 16....


Invitations to Sweet 16 parties apparently stretch over a couple of years when you've got a teenager. So out come the papers for yet another card. I tend to check out the latest sketch by My Favorite Things (MFT) when I need to put this kind of card together because the stamps I've collected go well with this theme and I can enter it into their current contest. I can only hope it's a random selection for the winner though. Lol. Have you been to their blog? Amazing artists at work over there!

So sketch challenge MFTWSC72 was incorporated here. I used the Birthday Girl stamp set and label die from MFT, as well as lovely papers from K&Co's Que Sera Sera stack. (I wanted to liven up that cupcake liner so I dabbed on some copic pink after coloring it light brown. *smile*)

I'll make it short and sweet today. Thanks for dropping in!

Monday, May 21, 2012

Prom that-a-way...


Hi! Sorry for the long hiatus, but the end of the school year brings lots of events that take me away from the crafty desk.

In this case, the event required a card.

Long ago and far away, when I went to prom, it involved a dinner before, the prom itself and then straight home.

Now, it involves a pre-pre prom get together with a small group of friends to take a few pictures, then a pre-prom get together with the entire class (at one classmate's house) so that all the parents can take pictures galore, then there's the prom in the school cafeteria, then there's a post prom party (at some saint-of-a-parent's house), then back to the very first location for the post-post get together. Because of the lateness of the hour, kids who drive can't be on the roads so they stay overnight and the hosting parents get to stay up all night with them. Saints, I tell you.

Well, this card is a thank you to that hosting family because they came up with the idea of renting a bus to take the small group of kids to their various venues all night. Saves everyone the dropping off and picking up all night. We all chipped in but I had to thank them for the idea, the execution and their hospitality.

I had a My Mind's Eye glitter stack in my stash called Academy. All school-related papers. One perfect sheet of glittery school buses going to and fro. The stamped image from Unity's A Little Destination set seemed a perfect compliment and the Spellbinders oval dies set it off nicely. A little contrasting ribbon and done. After I took the picture, I wrote in the name of the pre-prom host family's name in the larger rectangular sign so that it was customized to our experience that night.

So much story. Hope you stayed to read it all. Lol.

Tomorrow, I'll have a card for a Sweet Sixteen celebration that uses the latest sketch over at My Favorite Things.

Hope to see you back here.

Now to sort through all the prom pictures.... no mean feat... Lol.

Thursday, May 10, 2012

Wedding cake for an anniversary....

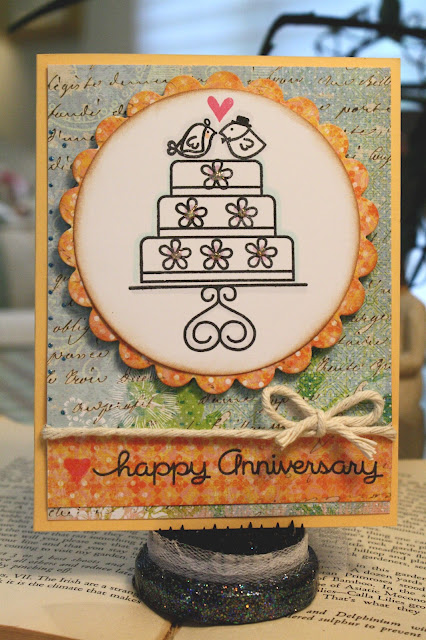
The next wedding I'm attending isn't for a few months and after that there may be a little drought where weddings are concerned so when I received my recent monthly sets of Paper Smooches stamps, I knew I'd have to think of other uses for their Hubby and Wifey set.

It wasn't a real stretch to use the wedding cake and those adorable birdies and flowers to make an anniversary card for my hubby. It took real willpower not to get too frilly with the card so I tamped it down a little with cooking twine... Lol. I found it at a housewares store and it keeps the card from being too "girly". I struggled a little with the whiteness of the area around the image so I inked the outer edges with a little soft brown ink. The papers are from K&Co's Que Sera Sera stack. I knew I'd find the sentiment amongst my other sets and, lo and behold, there it was in Good Gab.


I bought a long-stemmed chocolate rose covered in red foil and will put it and the card by his keys so that he sees it before heading out for the day tomorrow. After 32 years, he expects a handmade card (since I make so many) but the rose.... now that ought to be a surprise. *smile*

I hope you have a pleasant surprise today....